HP Pavilion G6 Manual


This HP Pavilion G6 manual user guide contains general information about HP Pavilion G6 notebook computers, including connect to a wireless network using WLAN, bluetooth wireless or using GPS. How to using the multimedia functions like audio, webcam and video. You can learn how to setting power management. If you have problem about driver you can see drives chapter for handling drives problem. You can protect your computer using passwords or using antivirus and firewall software. Another chapter you can read how to maintenance your notebook computer. 

Short description of HP Pavilion G6
HP Pavilion G6 is a versatile laptop for work and play. This model has an elegant appearance and is equipped with advanced technology for system performance and comfort while using the computer.  HP Pavilion G6 is equipped with high-definition LED display "HP BrightView" 15.6-inch display optimized for multitasking and to view HD-video. This laptop is comfortable to accompany you wherever you go, due its body compact, lightweight and extensive communication capabilities.

HP Pavilion G6 is based on a quad-core AMD Quad-Core A8-3500m, has 8 GB of memory, video card ATI Radeon HD 6620G Discrete-Class and a large hard drive with 1000 GB. You can connect to the Internet via a wired or wireless Wi-Fi. HP Pavilion G6 has a complete set of modern communication tools. Multiformat card reader allows you to read information from memory cards commonly used formats, which allows for recording and reading information from devices such as cameras, camcorders, GPS-navigator, no need to look for a suitable wire.


Read More..

Service Manual Nokia 6230

The 6230i has a decent 65k screen with a bright active matrix display and a good resolution, although it lags behind newer phones. The 1.3 megapixel camera is acceptable, and the video recorder can record for up to 1 hour.

A welcome feature is the memory card that can be expanded up to 512 Mbytes. This provides plenty of capacity for storing videos and MP3 tracks.

In terms of connectivity, the 6230i has it all: wireless Bluetooth™ capability, plus USB cable and infrared options. Internet access is fast with EDGE high-speed data transfer, and the phone is equipped with an XHTML browser for viewing websites. Email is also available.

There are a range of voice features including voice dialling, voice commands and an integrated handsfree speaker.

All things considered, the 6230i is still a nice phone. There are no real shortcomings with this phone, apart from its age, so if youre looking for a bargain, this could be a good buy (if you can still find it in the shops!)

http://www.ziddu.com/download/12807310/servicemanual62301.rar.html

Read More..

Manual Service Honda Tiger 2000


Manual Service Honda Tiger 2000 [Indonesia Version]

http://bebasupload.com/833n5j5wulzq/Honda_Tiger_2000_Service_Manual_2.pdf.html

Powered by Qumana
Read More..

Samsung ES60 Manual

Samsung ES60 is a digital camera that is practical and easily managed with an edgy and sporty design, the Samsung ES60 has a CCD image sensor in sizes 1/2, 33-inch and 12-megapixel resolution, 3x optical zoom and 3X digital zoom as well. The photos were obtained by Samsung ES60 achieve a maximum resolution of 4000 x 3000 pixels in JPEG format and video clips recorded can have resolution: AVI - 640 x 480 - 30 fps / sec, AVI - 640 x 480-15 fps / s, AVI - 320 x 240 - 30 fps / sec and AVI - 320 x 240 - 15 F / s. The Samsung ES60 has an active matrix LCD screen with TFT 2.5 inch, 230,000-pixel.

As for storage of data, the Samsung ES60 has an internal memory of 11 MB expandable with the memory cards such as SD, SDHC, and MultiMediaCardplus, to store important data, can also be synchronized with compatible devices due presence of a USB interface. Among the many features of the Samsung ES60 measures include: built-in speaker, date / time stamp, DPOF support, sharpness control, digital image rotation, PictBridge support, cropping an image, resizing an image, saturation control, face retouch, in-camera red -eye fix, brightness control, contrast control, face detection, built-in help guide, ACB (Auto contrast Balance), Exif Print support, Blink detection technology, Smile detection technology.

Samsung ES60 Manual

This Samsung ES60 Manual User Guide made by Samsung to make it easier and help you begin to operate and understand the functions or features ot this digital camera. This manual consists of 98 pages with a size 6.38 MB composed of five chapter in pdf file format. Summary content about this Samsung ES60 Manual; identification features of Samsung ES63 when using this camera for the first time, instructions for recording function with LCD indicator and how to use menu to starting the recording mode, learn for setup and setting sound and display menu, instructions how to use software menu such as system requirements and how to starting up the application software.

Download or view this Samsung ES60 Manual User Guide

Read More..

How to Create Show or Hide Links for Posts on Blogger


1. Login to Blogger, Chose "Layout --> Template --> Edit HTML
2. Click "Download Full Templates" link to back up your template.
3. Check on the "Expand Template Wdiget" Check Box.
4. Copy the code below and paste above this code </head>

<script src=http://kendhin.890m.com/Readmore.js type=text/javascript/>
5. Then find this code <div class=post-header-line-1/> .
6. If You found it you will see a code like this:

<div class=post-body entry-content>or
<div class=post body>


7. The next step is change or replace the code (Only Number 6 code) to be like this:

<div class=post-body entry-content expr:id="post-" + data:post.id>
<b:if cond=data:blog.pageType == "item">

8. Under it you will see a code like this <p><data:post.body/></p>
9. Put the code below under it.

<b:else/>
<style>#fullpost {display:none;}</style>
<p><data:post.body/></p>
<span id=showlink>
<p><a expr:onclick="javascript:showFull("post-" + data:post.id + "");" href=javascript:void(0);>[+/-] Show Full Post...</a></p>
</span>
<span id=hidelink style=display:none>
<p><a expr:onclick="javascript:hideFull("post-" + data:post.id + "");" href=javascript:void(0);>[+/-]Hide Full Post...</a></p>
</span>
<script type=text/javascript>checkFull("post-" + "<data:post.id/>")</script>
</b:if>
10. So, the full code will like this :

<div class=post-header-line-1/> 
<div class=post-body entry-content expr:id="post-" + data:post.id>
<b:if cond=data:blog.pageType == "item">
<p><data:post.body/></p>

<b:else/>
<style>#fullpost {display:none;}</style>
<p><data:post.body/></p>
<span id=showlink>
<p><a expr:onclick="javascript:showFull("post-" + data:post.id + "");" href=javascript:void(0);>[+/-] Show Full Post...</a></p>
</span>
<span id=hidelink style=display:none>
<p><a expr:onclick="javascript:hideFull("post-" + data:post.id + "");" href=javascript:void(0);>[+/-] Hide Full Post...</a></p>
</span>
<script type=text/javascript>checkFull("post-" + "<data:post.id/>")</script>
</b:if>
11. Save Your Editing.
12. Go to menu "Setting --> Formatting"
13. On the bottom page you will see a box beside text "Post Template". Copy the code below and paste in to the box

<span id="fullpost">


</span>
14. Save your setting.
15 If you want to post an articel place your part articel above this code <span id="fullpost">. Then the remain or full post put between this code <span id="fullpost"> and this </span>

Happy Blogging>>>>>
Read More..

New Multi Tabbed Widgets For Blogger BlogSpot Blogs

One of the space efficient widget for blogs, is of course a multi-tabbed widget, which is almost a must for any blog. You can use it for Popular posts, Top commenters, Recent Posts, Recent Posts or any widget as you like.

Although you can find some other methods on Internet, but they are all quite confusing, so you can use this method, which is quite easy, but of course needs to tweak the template.

The complete process has mainly two steps:


UPDATE:  I updated some of my posts, this post I update Add Multi Tabbed Navigation Widget To Blogger / Blogspot Blogs Sidebar........


STEP 1


Log in to Blogger. Now go to Layout and then click on "Edit HTML" tab.
Then download the present template as a backup.
Now find [CTRL+F] this code:


</head>


Then immediately ABOVE / BEFORE it, paste this code:


<!--NEW-MUTITABBED-STARTS--><link href=http://dsai.588.googlepages.com/tabcontent.css rel=stylesheet type=text/css/>
<script src=http://dsai.588.googlepages.com/tabcontent.js type=text/javascript>
/***********************************************
* Tab Content script v2.2- &#169; Dynamic Drive DHTML code library (www.dynamicdrive.com)
* This notice MUST stay intact for legal use
* Via http://BloggerStop.Net
* Visit Dynamic Drive at http://www.dynamicdrive.com/ for full source code
***********************************************/
</script><!--NEW-MUTITABBED-STOPS-->


Now click Save Template, and

Click on "Page Elements" tab.


Then click on "Add a Gadget", and select it as "HTML/JavaScript" type.

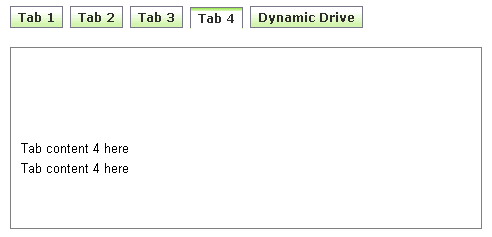
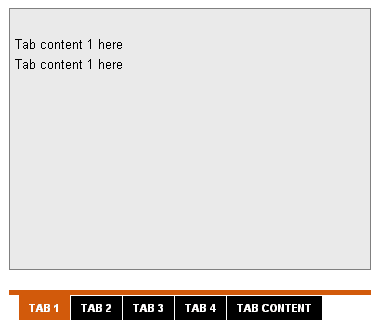
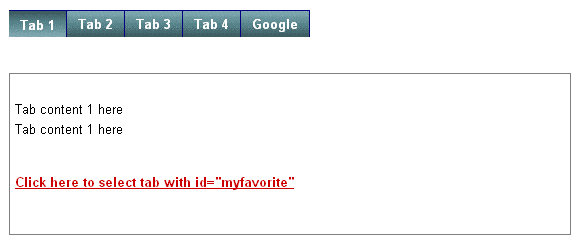
In the new widget, paste any of the 3 codes displayed below (the screen-shots are displayed above the codes, and demo link has already been given above ):


Code Here:


<h3>Demo #1- Basic implementation</h3>

<ul id="countrytabs" class="shadetabs">
<li><a href="#" rel="country1" class="selected">Tab 1</a></li>
<li><a href="#" rel="country2">Tab 2</a></li>
<li><a href="#" rel="country3">Tab 3</a></li>
<li><a href="#" rel="country4">Tab 4</a></li>
<li><a href="http://bdlab.blogspot.com/">Dynamic Drive</a></li>
</ul>

<div style="border:1px solid gray; width:450px; margin-bottom: 1em; padding: 10px">

<div id="country1" class="tabcontent">
Tab content 1 here<br />Tab content 1 here<br />
</div>

<div id="country2" class="tabcontent">
Tab content 2 here<br />Tab content 2 here<br />
</div>

<div id="country3" class="tabcontent">
Tab content 3 here<br />Tab content 3 here<br />
</div>

<div id="country4" class="tabcontent">
Tab content 4 here<br />Tab content 4 here<br />
</div>

</div>

<script type="text/javascript">

var countries=new ddtabcontent("countrytabs")
countries.setpersist(true)
countries.setselectedClassTarget("link") //"link" or "linkparent"
countries.init()

</script>

<p><a href="javascript:countries.cycleit(prev)" style="margin-right: 25px; text-decoration:none">Back</a> <a href="javascript: countries.expandit(3)">Click here to select last tab</a> <a href="javascript:countries.cycleit(next)" style="margin-left: 25px; text-decoration:none">Forward</a></p>


Code Here:


<h3>Demo #2- Different Tab Style, expanding of arbitrary DIVs on the page enabled</h3>

<div id="flowernote" style="display:none; position:absolute; right: 30px; width:150px; height:150px; background-color:red; color:white">
Arbitrary DIV 1
</div>

<div id="flowernote2" style="display:none; position:absolute; right: 200px; width:80px; height:80px; background-color:black; color:white">
Arbitrary DIV 2
</div>

<div id="flowernote3" style="display:none; position:absolute; right: 30px; width:140px; height:140px; background-color:navy; color:white">
Arbitrary DIV 3
</div>


<div style="border:1px solid gray; width:350px; height: 250px; background-color: #EAEAEA; padding: 5px">

<div id="tcontent1" class="tabcontent">
Tab content 1 here<br />Tab content 1 here<br />
</div>

<div id="tcontent2" class="tabcontent">
Tab content 2 here<br />Tab content 2 here<br />
</div>

<div id="tcontent3" class="tabcontent">
Tab content 3 here<br />Tab content 3 here<br />
</div>

<div id="tcontent4" class="tabcontent">
Tab content 4 here<br />Tab content 4 here<br />
</div>

</div>

<div id="flowertabs" class="modernbricksmenu2">
<ul>
<li><a href="#" rel="tcontent1" class="selected">Tab 1</a></li>
<li><a href="#" rel="tcontent2" rev="flowernote,flowernote2">Tab 2</a></li>
<li><a href="#" rel="tcontent3">Tab 3</a></li>
<li><a href="#" rel="tcontent4" rev="flowernote3">Tab 4</a></li>
<li><a href="http://bdlab.blogspot.com/">Tab Content</a></li>
</ul>
</div>
<br style="clear: left" />

<script type="text/javascript">

var myflowers=new ddtabcontent("flowertabs")
myflowers.setpersist(true)
myflowers.setselectedClassTarget("link") //"link" or "linkparent"
myflowers.init()

</script>

<p><b><a href="javascript: myflowers.expandit(2)">Click here to select 3rd tab</a></b></p>
<p><b><a href="current.htm?flowertabs=1">Reload page and select 2nd tab using URL parameter</a></b></p>


With Auto-scrolling tabs...


Code Here:


<h3>Demo #3- Different Tab Style, "slideshow mode" enabled</h3>

<div id="pettabs" class="indentmenu">
<ul>
<li><a href="#" rel="dog1" class="selected">Tab 1</a></li>
<li><a href="#" rel="dog2">Tab 2</a></li>
<li><a href="#" rel="dog3">Tab 3</a></li>
<li><a href="#" rel="dog4" id="myfavorite">Tab 4</a></li>
<li><a href="http://www.google.com">Google</a></li>
</ul>
<br style="clear: left" />
</div>

<div style="border:1px solid gray; width:550px; height: 150px; padding: 5px; margin-bottom:1em">

<div id="dog1" class="tabcontent">
Tab content 1 here<br />Tab content 1 here<br />
<p><b><a href="javascript: mypets.expandit(myfavorite)">Click here to select tab with id="myfavorite"</a></b></p>
</div>

<div id="dog2" class="tabcontent">
Tab content 2 here<br />Tab content 2 here<br />
</div>

<div id="dog3" class="tabcontent">
Tab content 3 here<br />Tab content 3 here<br />
</div>

<div id="dog4" class="tabcontent">
Tab content 4 here<br />Tab content 4 here<br />
</div>

</div>


<script type="text/javascript">

var mypets=new ddtabcontent("pettabs")
mypets.setpersist(true)
mypets.setselectedClassTarget("link")
mypets.init(2000)

</script>


Now click Save
Read More..

Multi Level Drop Down Menu In Blogger BlogSpot Blogs


UPDATE:  I updated some of my posts, this post I update 17+ Drop Down Menu Widget in Blogger - Horizontal Menus With CSS & HTML Codes........


Log in to blogger, go to "Layout", click on "Edit HTML" tab.
Now find (CTRL+F) this in the template:


</head>
Immediately BEFORE it, place this code:


<link rel="stylesheet" type="text/css" href="http://mydatanest.com/............/slidemenu_hori.css" />

<!--[if lte IE 7]>
<style type="text/css">
html .jqueryslidemenu{height: 1%;} /*Holly Hack for IE7 and below*/
</style>
<![endif]-->

<script type="text/javascript" src="http://ajax.googleapis.com/ajax/libs/jquery/1.2.6/jquery.min.js"></script>
<script type="text/javascript" src="http://mydatanest.com/.............../slidemenu_horiz.js"></script>
Now click Save Template 


STEP 2:
Now go to "Page Elements" of  "Layout".
Add a Gadget of HTML/JavaScript type.

Then add this code in to it:


<div id="myslidemenu" class="jqueryslidemenu">
<ul>
<li><a href="http://www.dynamicdrive.com">Item 1</a></li>
<li><a href="#">Item 2</a></li>
<li><a href="#">Folder 1</a>
<ul>
<li><a href="#">Sub Item 1.1</a></li>
<li><a href="#">Sub Item 1.2</a></li>
<li><a href="#">Sub Item 1.3</a></li>
<li><a href="#">Sub Item 1.4</a></li>
</ul>
</li>
<li><a href="#">Item 3</a></li>
<li><a href="#">Folder 2</a>
<ul>
<li><a href="#">Sub Item 2.1</a></li>
<li><a href="#">Folder 2.1</a>
<ul>
<li><a href="#">Sub Item 2.1.1</a></li>
<li><a href="#">Sub Item 2.1.2</a></li>
<li><a href="#">Folder 3.1.1</a>
<ul>
<li><a href="#">Sub Item 3.1.1.1</a></li>
<li><a href="#">Sub Item 3.1.1.2</a></li>
<li><a href="#">Sub Item 3.1.1.3</a></li>
<li><a href="#">Sub Item 3.1.1.4</a></li>
<li><a href="#">Sub Item 3.1.1.5</a></li>
</ul>
</li>
<li><a href="#">Sub Item 2.1.4</a></li>
</ul>
</li>
</ul>
</li>
<li><a href="http://bdlab.blogspot.com">Blogger Help</a></li>
</ul>
<br style="clear: left" />
</div>


Then save this widget. And drag it just above the posts widget.


note: this is not allowed all templates
Read More..