Showing posts with label for. Show all posts

The Best Tool for Embedding Spreadsheet Data in Webpages

Gone are the days when user had to buy expensive Excel add-ons to embed spreadsheet data into HTML web pages. Now one can use free online spreadsheet programs like Zoho Sheet, Google Docs & Spreadsheet or EditGrid to post live spreadsheet data on blogs.

We do a quick comparison of the embed feature offered by the above spreadsheet tools to help user decide the best online spreadsheet for userr job.


Google Spreadsheet: Google converts the spreadsheet data into HTML tables and embeds it using the IFRAME tag. You can either embed the entire spreadsheet, a specific sub-sheet or just a range of cells from one sheet (say A1:D9).

The spreadsheet data embedded in webpages will either remain static or refresh every five minutes depending on the settings that user have chosen at the time of publishing the Google sheet.

Since the embedded data is rendered as plain HTML table, site visitors can do little except view the data or copy-paste as plain text.


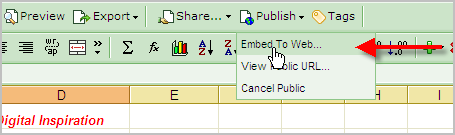
Zoho Sheet: Zoho has long been our favorite tool when it comes to embedding spredsheets. Upload an excel spreadsheet to Zoho, click the Publish button on the Zoho Sheet menu bar and user get a small HTML snippet for pasting inside userr blog - still the most user-friendly and non-geeky method.

Visitors can add/delete/format data inside the embedded sheets, perform calculations or even save the edited version onto their local hard-drives in Excel format.


EditGrid: With EditGrid, user get completely customize the look-n-feel of userr embedded spreadsheet including the cell colors, dimensions, headers and the grid lines. Depending on userr blogging platform, user can either embed data using HTML tables (DHTML) or though Javascript snippets.

Like ZohoSheet, EditGrid also provides a full-featured interactive but read-only spreadsheet with the menu bar. Visitors can easily export the spreadsheet data into variety of format including xls, pdf, csv, etc. However, user do not have the option to show specific sheet pages with Edit Grid.

Final Thoughts: We liked the different custom options offered by EditGrid and also that visitors can export spreadsheet data into multiple formats without leaving userr web page. 

Google Spreadsheets are plain HTML formatted text but they can be very useful in situations when the underlying data is changing quickly (like stock quotes or currency rates).

Zoho allows visitors to interact with the spreadsheet and save the changed data locally, a feature missing in all other online sheets.
Read More..

How to Create Show or Hide Links for Posts on Blogger


1. Login to Blogger, Chose "Layout --> Template --> Edit HTML
2. Click "Download Full Templates" link to back up your template.
3. Check on the "Expand Template Wdiget" Check Box.
4. Copy the code below and paste above this code </head>

<script src=http://kendhin.890m.com/Readmore.js type=text/javascript/>
5. Then find this code <div class=post-header-line-1/> .
6. If You found it you will see a code like this:

<div class=post-body entry-content>or
<div class=post body>


7. The next step is change or replace the code (Only Number 6 code) to be like this:

<div class=post-body entry-content expr:id="post-" + data:post.id>
<b:if cond=data:blog.pageType == "item">

8. Under it you will see a code like this <p><data:post.body/></p>
9. Put the code below under it.

<b:else/>
<style>#fullpost {display:none;}</style>
<p><data:post.body/></p>
<span id=showlink>
<p><a expr:onclick="javascript:showFull("post-" + data:post.id + "");" href=javascript:void(0);>[+/-] Show Full Post...</a></p>
</span>
<span id=hidelink style=display:none>
<p><a expr:onclick="javascript:hideFull("post-" + data:post.id + "");" href=javascript:void(0);>[+/-]Hide Full Post...</a></p>
</span>
<script type=text/javascript>checkFull("post-" + "<data:post.id/>")</script>
</b:if>
10. So, the full code will like this :

<div class=post-header-line-1/> 
<div class=post-body entry-content expr:id="post-" + data:post.id>
<b:if cond=data:blog.pageType == "item">
<p><data:post.body/></p>

<b:else/>
<style>#fullpost {display:none;}</style>
<p><data:post.body/></p>
<span id=showlink>
<p><a expr:onclick="javascript:showFull("post-" + data:post.id + "");" href=javascript:void(0);>[+/-] Show Full Post...</a></p>
</span>
<span id=hidelink style=display:none>
<p><a expr:onclick="javascript:hideFull("post-" + data:post.id + "");" href=javascript:void(0);>[+/-] Hide Full Post...</a></p>
</span>
<script type=text/javascript>checkFull("post-" + "<data:post.id/>")</script>
</b:if>
11. Save Your Editing.
12. Go to menu "Setting --> Formatting"
13. On the bottom page you will see a box beside text "Post Template". Copy the code below and paste in to the box

<span id="fullpost">


</span>
14. Save your setting.
15 If you want to post an articel place your part articel above this code <span id="fullpost">. Then the remain or full post put between this code <span id="fullpost"> and this </span>

Happy Blogging>>>>>
Read More..

New Multi Tabbed Widgets For Blogger BlogSpot Blogs

One of the space efficient widget for blogs, is of course a multi-tabbed widget, which is almost a must for any blog. You can use it for Popular posts, Top commenters, Recent Posts, Recent Posts or any widget as you like.

Although you can find some other methods on Internet, but they are all quite confusing, so you can use this method, which is quite easy, but of course needs to tweak the template.

The complete process has mainly two steps:


UPDATE:  I updated some of my posts, this post I update Add Multi Tabbed Navigation Widget To Blogger / Blogspot Blogs Sidebar........


STEP 1


Log in to Blogger. Now go to Layout and then click on "Edit HTML" tab.
Then download the present template as a backup.
Now find [CTRL+F] this code:


</head>


Then immediately ABOVE / BEFORE it, paste this code:


<!--NEW-MUTITABBED-STARTS--><link href=http://dsai.588.googlepages.com/tabcontent.css rel=stylesheet type=text/css/>
<script src=http://dsai.588.googlepages.com/tabcontent.js type=text/javascript>
/***********************************************
* Tab Content script v2.2- &#169; Dynamic Drive DHTML code library (www.dynamicdrive.com)
* This notice MUST stay intact for legal use
* Via http://BloggerStop.Net
* Visit Dynamic Drive at http://www.dynamicdrive.com/ for full source code
***********************************************/
</script><!--NEW-MUTITABBED-STOPS-->


Now click Save Template, and

Click on "Page Elements" tab.


Then click on "Add a Gadget", and select it as "HTML/JavaScript" type.

In the new widget, paste any of the 3 codes displayed below (the screen-shots are displayed above the codes, and demo link has already been given above ):


Code Here:


<h3>Demo #1- Basic implementation</h3>

<ul id="countrytabs" class="shadetabs">
<li><a href="#" rel="country1" class="selected">Tab 1</a></li>
<li><a href="#" rel="country2">Tab 2</a></li>
<li><a href="#" rel="country3">Tab 3</a></li>
<li><a href="#" rel="country4">Tab 4</a></li>
<li><a href="http://bdlab.blogspot.com/">Dynamic Drive</a></li>
</ul>

<div style="border:1px solid gray; width:450px; margin-bottom: 1em; padding: 10px">

<div id="country1" class="tabcontent">
Tab content 1 here<br />Tab content 1 here<br />
</div>

<div id="country2" class="tabcontent">
Tab content 2 here<br />Tab content 2 here<br />
</div>

<div id="country3" class="tabcontent">
Tab content 3 here<br />Tab content 3 here<br />
</div>

<div id="country4" class="tabcontent">
Tab content 4 here<br />Tab content 4 here<br />
</div>

</div>

<script type="text/javascript">

var countries=new ddtabcontent("countrytabs")
countries.setpersist(true)
countries.setselectedClassTarget("link") //"link" or "linkparent"
countries.init()

</script>

<p><a href="javascript:countries.cycleit(prev)" style="margin-right: 25px; text-decoration:none">Back</a> <a href="javascript: countries.expandit(3)">Click here to select last tab</a> <a href="javascript:countries.cycleit(next)" style="margin-left: 25px; text-decoration:none">Forward</a></p>


Code Here:


<h3>Demo #2- Different Tab Style, expanding of arbitrary DIVs on the page enabled</h3>

<div id="flowernote" style="display:none; position:absolute; right: 30px; width:150px; height:150px; background-color:red; color:white">
Arbitrary DIV 1
</div>

<div id="flowernote2" style="display:none; position:absolute; right: 200px; width:80px; height:80px; background-color:black; color:white">
Arbitrary DIV 2
</div>

<div id="flowernote3" style="display:none; position:absolute; right: 30px; width:140px; height:140px; background-color:navy; color:white">
Arbitrary DIV 3
</div>


<div style="border:1px solid gray; width:350px; height: 250px; background-color: #EAEAEA; padding: 5px">

<div id="tcontent1" class="tabcontent">
Tab content 1 here<br />Tab content 1 here<br />
</div>

<div id="tcontent2" class="tabcontent">
Tab content 2 here<br />Tab content 2 here<br />
</div>

<div id="tcontent3" class="tabcontent">
Tab content 3 here<br />Tab content 3 here<br />
</div>

<div id="tcontent4" class="tabcontent">
Tab content 4 here<br />Tab content 4 here<br />
</div>

</div>

<div id="flowertabs" class="modernbricksmenu2">
<ul>
<li><a href="#" rel="tcontent1" class="selected">Tab 1</a></li>
<li><a href="#" rel="tcontent2" rev="flowernote,flowernote2">Tab 2</a></li>
<li><a href="#" rel="tcontent3">Tab 3</a></li>
<li><a href="#" rel="tcontent4" rev="flowernote3">Tab 4</a></li>
<li><a href="http://bdlab.blogspot.com/">Tab Content</a></li>
</ul>
</div>
<br style="clear: left" />

<script type="text/javascript">

var myflowers=new ddtabcontent("flowertabs")
myflowers.setpersist(true)
myflowers.setselectedClassTarget("link") //"link" or "linkparent"
myflowers.init()

</script>

<p><b><a href="javascript: myflowers.expandit(2)">Click here to select 3rd tab</a></b></p>
<p><b><a href="current.htm?flowertabs=1">Reload page and select 2nd tab using URL parameter</a></b></p>


With Auto-scrolling tabs...


Code Here:


<h3>Demo #3- Different Tab Style, "slideshow mode" enabled</h3>

<div id="pettabs" class="indentmenu">
<ul>
<li><a href="#" rel="dog1" class="selected">Tab 1</a></li>
<li><a href="#" rel="dog2">Tab 2</a></li>
<li><a href="#" rel="dog3">Tab 3</a></li>
<li><a href="#" rel="dog4" id="myfavorite">Tab 4</a></li>
<li><a href="http://www.google.com">Google</a></li>
</ul>
<br style="clear: left" />
</div>

<div style="border:1px solid gray; width:550px; height: 150px; padding: 5px; margin-bottom:1em">

<div id="dog1" class="tabcontent">
Tab content 1 here<br />Tab content 1 here<br />
<p><b><a href="javascript: mypets.expandit(myfavorite)">Click here to select tab with id="myfavorite"</a></b></p>
</div>

<div id="dog2" class="tabcontent">
Tab content 2 here<br />Tab content 2 here<br />
</div>

<div id="dog3" class="tabcontent">
Tab content 3 here<br />Tab content 3 here<br />
</div>

<div id="dog4" class="tabcontent">
Tab content 4 here<br />Tab content 4 here<br />
</div>

</div>


<script type="text/javascript">

var mypets=new ddtabcontent("pettabs")
mypets.setpersist(true)
mypets.setselectedClassTarget("link")
mypets.init(2000)

</script>


Now click Save
Read More..

In HSDPA how does the network manage the throughput on the Radio Interface for a user connection

Modulation (16QAM, QPSK etc), Coding (convolution coding, fire codes etc), number of codes allocated and scheduling (its a shared resource)

Read More..

Vote for your favorite MMORPG

Now you can vote for your favorite game.
Read More..

Cisco Recertification Is An Essential Asset For Professionals In Technology

By Mike Davis


Once a person receives Cisco training in the field of technology, it is essential for that individual to commit to periodic recertification. Recertification helps a person to stay aware of the latest technological advances and procedures. Recertifying may assist a professional in securing employment, keeping a job, and getting promoted to higher positions.

Up to date knowledge

Along with aiding an individual in the pursuit of continuing an education, recertification demonstrates to clients and employers that a person knows about changes in the technological industry. As technology evolves continuously, industry professionals need to remain aware of advancements that are relevant. Those professionals who do not stay informed as technology evolves are not likely to be equipped to work in the field. Many employers and clients are aware that this is true.

The training and educational system is thorough, and established guidelines can help people to stay educated. Cisco implements these rules to enable professionals to easily remain current on their recertification. They must first register to recertify, and then they must pass the exams that are required.

Expiration

It is essential that individuals learn what they need to do to meet exam requirements, before current certification expires. People who do not do so will be required to repeat the first exam process completely. Another way to stay current on certification is to recertify by achieving the next level of certification.

The expiration for entry level, associate level, and professional level certification is three years. This means that a person who has attained associate level CCNA training, for example, would need to recertify within three years of the last certification. CCENT and CCT are the entry level certifications. The associate and professional levels of training include an array of various options.

The deadline for all CCIE certifications is two years, which means that people who have achieved such certifications must recertify within the two year period after the last certification. CCDE and CCIE certifications comprise the expert level Cisco certifications. Expert level CCIE certifications include expert training in such things as collaboration, security and wireless.

A professional who has received Cisco architect certification has attained the CCAr certification. The CCAr is the highest certification achievable that is provided within the training system at Cisco. Recertification for a person of architect status must be achieved within five years.

Specialist certifications have a recertification deadline of two years. A wide array of of specialist certifications is available. Professionals may be certified as specialists in data center, collaboration, operating system hardware, video, and security.

Cisco training

Remaining educated on the continuous advances that occur in technology is important. Those who work in the field must stay aware of changes, and they need to know the best ways to implement such changes. Cisco training gives students the education needed to stay useful in a competitive industry. Learning the rules regarding recertification can be helpful. A professional who knows and complies with recertification guidelines will ultimately save money, effort and time that could probably be better spent on other things. Countless individuals are grateful to have the opportunity to recertify, since it may greatly enhance a career in the field of technology.


About the Author:


Read More..