Showing posts with label in. Show all posts

Sourcing and Sinking Concept in PLC


While connecting field devices to Programmable Logic Controllers we always get confused about sinking and sourcing operations. Also this sinking & sourcing concept is useful to answer PLC interview questions.
Sinking and sourcing operations refer to electrical configurations of the circuit in the module & field input devices.
When a device provides current when it is ON it is said to be sourcing current.
When a device receives current when it is ON it is said to be sinking current.
There are both sinking & sourcing field devices as well as sinking & sourcing input module.
But it’s a common practice to use input module in sinking current mode.


·        Field devices on the positive side (+VDC) of the field power supply are sourcing field devices.
·        Field devices on the negative side (DC COM) of the field power supply are sinking field   devices.
·        Sourcing field devices must be connected to sinking I/O cards and vice versa.
·        Sinking field devices must be connected to sourcing I/O cards and vice versa.
Read More..

The Best Tool for Embedding Spreadsheet Data in Webpages

Gone are the days when user had to buy expensive Excel add-ons to embed spreadsheet data into HTML web pages. Now one can use free online spreadsheet programs like Zoho Sheet, Google Docs & Spreadsheet or EditGrid to post live spreadsheet data on blogs.

We do a quick comparison of the embed feature offered by the above spreadsheet tools to help user decide the best online spreadsheet for userr job.


Google Spreadsheet: Google converts the spreadsheet data into HTML tables and embeds it using the IFRAME tag. You can either embed the entire spreadsheet, a specific sub-sheet or just a range of cells from one sheet (say A1:D9).

The spreadsheet data embedded in webpages will either remain static or refresh every five minutes depending on the settings that user have chosen at the time of publishing the Google sheet.

Since the embedded data is rendered as plain HTML table, site visitors can do little except view the data or copy-paste as plain text.


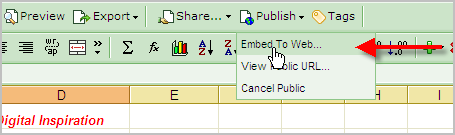
Zoho Sheet: Zoho has long been our favorite tool when it comes to embedding spredsheets. Upload an excel spreadsheet to Zoho, click the Publish button on the Zoho Sheet menu bar and user get a small HTML snippet for pasting inside userr blog - still the most user-friendly and non-geeky method.

Visitors can add/delete/format data inside the embedded sheets, perform calculations or even save the edited version onto their local hard-drives in Excel format.


EditGrid: With EditGrid, user get completely customize the look-n-feel of userr embedded spreadsheet including the cell colors, dimensions, headers and the grid lines. Depending on userr blogging platform, user can either embed data using HTML tables (DHTML) or though Javascript snippets.

Like ZohoSheet, EditGrid also provides a full-featured interactive but read-only spreadsheet with the menu bar. Visitors can easily export the spreadsheet data into variety of format including xls, pdf, csv, etc. However, user do not have the option to show specific sheet pages with Edit Grid.

Final Thoughts: We liked the different custom options offered by EditGrid and also that visitors can export spreadsheet data into multiple formats without leaving userr web page. 

Google Spreadsheets are plain HTML formatted text but they can be very useful in situations when the underlying data is changing quickly (like stock quotes or currency rates).

Zoho allows visitors to interact with the spreadsheet and save the changed data locally, a feature missing in all other online sheets.
Read More..

Multi Level Drop Down Menu In Blogger BlogSpot Blogs


UPDATE:  I updated some of my posts, this post I update 17+ Drop Down Menu Widget in Blogger - Horizontal Menus With CSS & HTML Codes........


Log in to blogger, go to "Layout", click on "Edit HTML" tab.
Now find (CTRL+F) this in the template:


</head>
Immediately BEFORE it, place this code:


<link rel="stylesheet" type="text/css" href="http://mydatanest.com/............/slidemenu_hori.css" />

<!--[if lte IE 7]>
<style type="text/css">
html .jqueryslidemenu{height: 1%;} /*Holly Hack for IE7 and below*/
</style>
<![endif]-->

<script type="text/javascript" src="http://ajax.googleapis.com/ajax/libs/jquery/1.2.6/jquery.min.js"></script>
<script type="text/javascript" src="http://mydatanest.com/.............../slidemenu_horiz.js"></script>
Now click Save Template 


STEP 2:
Now go to "Page Elements" of  "Layout".
Add a Gadget of HTML/JavaScript type.

Then add this code in to it:


<div id="myslidemenu" class="jqueryslidemenu">
<ul>
<li><a href="http://www.dynamicdrive.com">Item 1</a></li>
<li><a href="#">Item 2</a></li>
<li><a href="#">Folder 1</a>
<ul>
<li><a href="#">Sub Item 1.1</a></li>
<li><a href="#">Sub Item 1.2</a></li>
<li><a href="#">Sub Item 1.3</a></li>
<li><a href="#">Sub Item 1.4</a></li>
</ul>
</li>
<li><a href="#">Item 3</a></li>
<li><a href="#">Folder 2</a>
<ul>
<li><a href="#">Sub Item 2.1</a></li>
<li><a href="#">Folder 2.1</a>
<ul>
<li><a href="#">Sub Item 2.1.1</a></li>
<li><a href="#">Sub Item 2.1.2</a></li>
<li><a href="#">Folder 3.1.1</a>
<ul>
<li><a href="#">Sub Item 3.1.1.1</a></li>
<li><a href="#">Sub Item 3.1.1.2</a></li>
<li><a href="#">Sub Item 3.1.1.3</a></li>
<li><a href="#">Sub Item 3.1.1.4</a></li>
<li><a href="#">Sub Item 3.1.1.5</a></li>
</ul>
</li>
<li><a href="#">Sub Item 2.1.4</a></li>
</ul>
</li>
</ul>
</li>
<li><a href="http://bdlab.blogspot.com">Blogger Help</a></li>
</ul>
<br style="clear: left" />
</div>


Then save this widget. And drag it just above the posts widget.


note: this is not allowed all templates
Read More..

In HSDPA how does the network manage the throughput on the Radio Interface for a user connection

Modulation (16QAM, QPSK etc), Coding (convolution coding, fire codes etc), number of codes allocated and scheduling (its a shared resource)

Read More..

How to Use Function Pointers in C

A function pointer is, in essence, just a pointer to a function. In languages such as C++, each function and variable in a computer program exists as a memory address, and a variable can contain the value of that address. That variable can be passed to a callback, which can then call the function that the variable points to. It can also be used in an event manager, or for late binding of a member function. Due to their complicated syntax, function pointers are often avoided by programmers, but can be used to easily accomplish many powerful tasks.

Instructions

Things Youll Need:

  • C++ compiler
  1. Step 1

    Write a C++ program. This is the program in which you will use a function pointer.

  2. Step 2

    Define a function pointer. You can do this one of several ways. Declare a function, such as:

    void doSomething(int data);

    and later declare a pointer to it. Or, you can declare a function as a pointer:

    void (*doSomething)(int);

    Lastly, you can declare a typedef, then create a variable of that type.

    typedef void (*voidTakingInt)(int);

    You can now use "voidTakingInt" as a type:

    void doSomething(int data);
    voidTakingInt fun_ptr = &doSomething;

  3. Step 3

    Declare something that uses the function pointer. This will often be something that uses the function pointer as a callback function, so that when a specific event occurs, the function runs your function. One example is a file-loading function that takes a callback function to indicate progress.

  4. Step 4

    Call the function from the pointer to it. This would be done from within the function you wrote that accepts a function pointer as a parameter:

    void doSomething(int data) {
    }

    void callAnotherFunction(void (*otherFunction)(int)) {

    (*otherFunction)(3);

    }

    int main(int argc, char* argv[]) {

    callAnotherFunction(&doSomething);
    return 0;

Read More..

How to Access My Computer From the Command Line in XP

If you need to access the command line inside of your Windows XP computer, there are two ways to do it. One way assumes that your computer is working properly, while the other assumes that your computer is malfunctioning, and you cant boot it up normally. Either way, accessing your computer through a command line is a straightforward process.

Instructions

    Command Line Access with a Working Computer

  1. Step 1

    Turn on your computer and log into Windows as you normally would.

  2. Step 2

    Wait for the operating system to load completely, then click on the "Start" button, then click on the "Run" button and type "cmd" (without quotes). Alternatively, click on the "Start" button, click on "All Programs," "Accessories" and "System Tools," and then click on the "Command Prompt" program choice.

  3. Step 3

    Wait for the command prompt window to open. When finished, close the window by typing "exit" and pressing the "Enter" key.

  4. Command Line Access When Windows Wont Boot

  5. Step 1

    Insert your original Windows XP CD into the computer and restart it. Choose the startup option that will allow you to boot from CD, then press any key to start the CD boot process.

  6. Step 2

    Wait for the boot loader to go through the automated loading screens, then press the "R" key once the process has completed. This will start the Recovery Console.

  7. Step 3

    At the command prompt, enter your username and password that you use to log on to Windows, then perform the operations you need to do. When finished, type "Exit," then press the "Enter" key to exit the Recovery Console. Restart the computer.

Read More..

Use windows 8 and windows 7 in one PC with a one time and with dual boot


The latest version of the Windows operatingsystem is Windows 8. Many people have already started to use it. But many people prefer the older version of Windows 7 has gone. Some are going to and fro. Many people are worried about whether you want to use any Windows 8. This option will
work for them. Install Windows 7 and use or enjoy Windows 8, with a pure mind dual boot it. Then you can take a look at the same time usingtwo versions of the ones you like, whereyou will feel comfortable. Lets have a look at the steps to dual boot.Now we will see that How to use windows 7 and Windows 8 in one pc with any time.

Take a backup of your system files tothe beginning, because a lot of your valuable datamay be lost during the partitioning process.Can be fully or partially deleted files no worth? Dual boot will keep backup before so sensible.

1.  First, add a new partition for Windows 7.

2. Then install Windows 8.

Now we will see how to create partition in windows 7.

Windows 7 will be adding a new partition:


Follow these steps.

Step-1: Press “Win + R” shortcut on your Windows 7 PC for open run options. Please type "diskmgmt.msc". Type in the Disk Management window will open immediately.

Step-2: Now the C drive, Windows will create space for new operating system windows 8. Right click on the C drive in Disk Management. Please select "Shrink Volume".

Step-3: A new window will open, "Querying volume for available shrink space, please wait". System to wait for responses. Then select how much space you want to shrink.

Step-4: You shrink to wait until the end of the task. Then unallocated partition-click on the Right. Then select New Simple Volume option. Then format the new partition. You can rename the volume label Windows 8.

Windows 8 InstallationProcess:


When you have completed the above process willbegin the process of installing Windows 8.

Step-1: Insert the DVD orUSB drive in Windows 8 PC Bothabale. Then reboot to install Windows 8.

Step-2: Windows setup during the Type of installation asCustom option selected.

Step-3: The setup process will get the option "Where do you want to install Windows". At the time you create a new partition to install Windows 8 choose.  In general, the Windows install process then ends.

Dual boot after the whole process will be completed and you can use the same PC for Windows 8 and Windows 7. After the installation is finished, your boot menu to show both Windows 8 and Windows  7.  Within 30 seconds from the boot menu in Windows 8 will start by default. However, if you want Windows 7 will start all-time you can set it as the default. That is why the boot menu "Change defaults or choose other options" option to enter the change.

Windows is the graphics are quite nice. Many new features have been added to the Microsoft. Sometime a little uncomfortableto use, but the beginning of a new environment, but ifyou can fixit. Windows 8 and Seven together better than theones you feel understood.

That’s it. Visit regular Web Tutorials for get more option of windows 8.

Read More..